
Welcome to the ultimate guide for creating mouthwatering cake balls! As a passionate baker, I’m excited to share my easy cake balls recipe that transforms ordinary cake into delightful bite-sized treats. These sweet sensations are perfect for parties, gifts, or satisfying your dessert cravings.
My cake balls recipe is designed to be simple yet impressive. Whether you’re a beginner or an experienced baker, you’ll find these instructions straightforward and fun. With just a few ingredients and some creativity, you can craft delectable cake balls that will wow everyone who tries them.
What makes this cake balls recipe special is its versatility. You can experiment with different cake flavors, frostings, and coatings to create unique combinations that suit your taste. From classic chocolate to fun seasonal variations, the possibilities are endless!
In this comprehensive guide, I’ll walk you through every step of creating perfect cake balls. You’ll learn essential techniques, discover pro tips, and gain the confidence to make bakery-worthy treats right in your own kitchen. Get ready to embark on a delicious baking adventure!
Why Cake Balls Are the Perfect Sweet Treat
As a baking enthusiast, I’ve discovered that homemade cake balls are more than just a delightful dessert – they’re a culinary adventure that combines creativity, taste, and pure joy. These bite-sized treats have captured the hearts of dessert lovers everywhere, transforming ordinary cake into something extraordinary.
The Delightful Origins of Cake Balls
Cake balls emerged as a clever way to repurpose leftover cake. Bakers discovered that crumbled cake mixed with frosting creates a delectable treat that’s both portable and irresistible. What started as a simple solution to reduce food waste has now become a gourmet dessert phenomenon.
Why Make Homemade Cake Balls?
Creating the best cake balls recipe at home offers numerous advantages. You can customize flavors, control ingredient quality, and save money compared to store-bought options. Homemade cake balls allow for endless creativity – from classic chocolate to unique flavor combinations that surprise and delight.
| Benefit | Homemade Advantage |
|---|---|
| Cost | Significantly cheaper than bakery versions |
| Flavor Variety | Unlimited creative combinations |
| Quality Control | Choose premium ingredients |
Whether you’re preparing for a party, looking for a special gift, or simply wanting to indulge your sweet tooth, homemade cake balls are the perfect solution. They’re small enough to be guilt-free yet packed with enough flavor to satisfy any dessert craving.
Essential Ingredients for Perfect Cake Balls Recipe
Creating delicious cake balls starts with selecting the right ingredients. My cake balls recipe requires a few key components that transform simple cake into bite-sized delights. The foundation of any great chocolate cake balls begins with high-quality ingredients that ensure maximum flavor and texture.
I’ll break down the essential ingredients you’ll need to craft mouth-watering cake balls. Your basic pantry staples will include a cake mix, frosting, and coating chocolate. Pro bakers know that the quality of each ingredient dramatically impacts the final result.
| Ingredient Category | Recommended Options | Purpose |
|---|---|---|
| Cake Base | Chocolate, Vanilla, Red Velvet | Provides primary flavor and texture |
| Frosting | Cream Cheese, Buttercream | Binds cake crumbs and adds moisture |
| Coating | Milk Chocolate, White Chocolate | Creates smooth exterior and additional flavor |
When preparing chocolate cake balls, I recommend using premium chocolate for coating. Melting chocolate requires patience and the right technique. Your goal is a smooth, glossy finish that makes these treats irresistible.
Experimentation is key in developing your signature cake balls recipe. Don’t be afraid to mix flavors and try unique combinations that showcase your culinary creativity.
Kitchen Tools and Equipment You’ll Need
Creating delicious vanilla cake balls requires the right tools and equipment. Whether you’re a beginner or a seasoned baker, having the proper gear can make your cake pops recipe experience smooth and enjoyable.
Essential Tools for Cake Ball Beginners
When starting your cake balls journey, you’ll want to gather some basic kitchen tools. A good mixer, mixing bowls, and a reliable baking sheet are crucial for your vanilla cake balls preparation. I recommend having a sturdy electric hand mixer or stand mixer to blend ingredients perfectly.
| Basic Tools | Purpose |
|---|---|
| Electric Mixer | Blend cake and frosting thoroughly |
| Mixing Bowls | Combine ingredients and mix cake balls |
| Baking Sheet | Cool and set cake balls |
| Measuring Cups | Ensure precise ingredient quantities |
Professional Equipment for Advanced Bakers
For those looking to elevate their cake pops recipe, consider investing in some professional-grade equipment. A digital scale, silicone molds, and a chocolate melting pot can help create more refined and consistent cake balls.
Storage and Packaging Solutions
Proper storage is key to maintaining the freshness of your vanilla cake balls. Airtight containers, cake pop stands, and decorative packaging can help preserve and present your delightful treats. Clear plastic boxes or specialized cake ball carriers are excellent options for storing and transporting your creations.
Choosing the Right Cake Base for Your Cake Balls
Creating the perfect cake balls starts with selecting the right cake base. Your choice of cake can make or break your easy cake balls recipe. I’ve discovered that different cake types bring unique textures and flavors to your sweet treats.
Classic vanilla and chocolate cakes are always reliable options for no-bake cake balls. These standard flavors work well for beginners and provide a foolproof foundation. White cake and yellow cake also create delightful results with smooth, consistent textures.
For those wanting to experiment, consider specialty cake flavors like red velvet, carrot cake, or funfetti. Each cake type offers a distinct taste profile that can elevate your cake balls from simple to spectacular. The key is understanding how different cake textures impact the final product.
| Cake Type | Texture | Flavor Profile |
|---|---|---|
| Vanilla | Light, Fluffy | Mild, Sweet |
| Chocolate | Dense, Rich | Deep, Intense |
| Red Velvet | Moist, Soft | Tangy, Subtle Cocoa |
Pro tip: Store-bought cakes work wonderfully for quick and easy cake balls. Don’t feel pressured to bake from scratch every time. The goal is creating delicious treats that everyone will enjoy!
Best Frosting Options for Moist Cake Balls
Crafting the perfect homemade cake balls starts with selecting the right frosting. The frosting acts as a binding agent that transforms crumbled cake into delectable cake truffles. My years of baking experience have taught me that choosing the right frosting can elevate your cake balls from good to extraordinary.
The key to creating irresistible cake balls is finding a frosting that provides the perfect moisture and flavor balance. Different frostings can dramatically change the texture and taste of your homemade cake balls.
Cream Cheese Frosting Tips
Cream cheese frosting is a game-changer for cake truffle recipe enthusiasts. Its tangy flavor and creamy consistency help bind cake crumbs perfectly. I recommend using full-fat cream cheese at room temperature for the smoothest mixture. Start with small amounts and gradually add more to achieve the ideal consistency that holds the cake balls together.
Buttercream Variations
Buttercream offers incredible versatility for cake balls. Classic vanilla buttercream works well with most cake flavors. Chocolate buttercream can add depth to chocolate-based cake balls. For a twist, try adding extracts like almond or mint to create unique flavor profiles in your homemade cake balls.
Store-bought Alternatives
When time is tight, store-bought frostings can be a quick solution for your cake truffle recipe. Look for thick, creamy options that will help bind the cake crumbs. Avoid frostings that are too runny, as they won’t provide the necessary structure for perfect cake balls.
Pro tip: Always chill your frosted cake balls before serving to help them maintain their shape and enhance their flavor.
Step-by-Step Mixing and Rolling Process
Creating the perfect cake balls recipe requires precision and patience. I’ll walk you through the essential mixing and rolling techniques that will transform your homemade dessert into a professional-looking treat. The key to the best cake balls recipe is achieving the right texture and consistency.
Start by crumbling your prepared cake into fine, even crumbs. I recommend using a food processor or your hands to break down the cake completely. Ensure no large chunks remain, as these can disrupt the smooth texture of your cake balls.
Next, gradually add frosting to the crumbled cake. The crucial part of any cake balls recipe is finding the perfect moisture balance. Add frosting slowly, mixing thoroughly until the mixture holds together when rolled. Too little frosting will result in dry cake balls, while too much will make them too soft and difficult to shape.
When rolling, use clean hands and work with small portions of the mixture. I suggest using a cookie scoop or tablespoon to create uniform sizes. Roll the mixture between your palms, creating smooth, round balls about 1-1.5 inches in diameter. Place the rolled cake balls on a parchment-lined baking sheet.
Pro tip for the best cake balls recipe: refrigerate the rolled balls for 15-20 minutes before coating. This helps them maintain their shape and makes the coating process much easier. With these techniques, you’ll create picture-perfect cake balls that look like they came from a professional bakery.
Coating Techniques for Professional-Looking Results
Creating beautiful chocolate cake balls requires mastering the art of coating. The right technique can transform your homemade treats from simple to spectacular. I’ll share my favorite methods for achieving that perfect, smooth chocolate shell that makes cake balls irresistible.
Chocolate Coating Pro Tips
When preparing chocolate cake balls, selecting the right coating is crucial. I recommend using high-quality chocolate melting wafers for the smoothest finish. Milk chocolate works great for sweeter cake pops, while dark chocolate provides a more sophisticated flavor for your cake pops recipe.
Melting Chocolate Like a Professional
The key to perfect chocolate cake balls is proper chocolate melting. I always use a double boiler or microwave with 50% power, stirring frequently to prevent burning. Maintaining the right temperature ensures a glossy, crack-free coating that looks totally professional.
| Chocolate Type | Melting Temperature | Best Use |
|---|---|---|
| Milk Chocolate | 86-90°F | Sweet Cake Balls |
| Dark Chocolate | 88-91°F | Rich Flavor Profiles |
| White Chocolate | 82-84°F | Decorative Drizzles |
Troubleshooting Coating Challenges
Sometimes chocolate coating can be tricky. If your coating is too thick, thin it with a bit of coconut oil. When cake balls fall off the stick, ensure they’re properly chilled and use a gentle dipping motion. Practice makes perfect with your cake pops recipe!
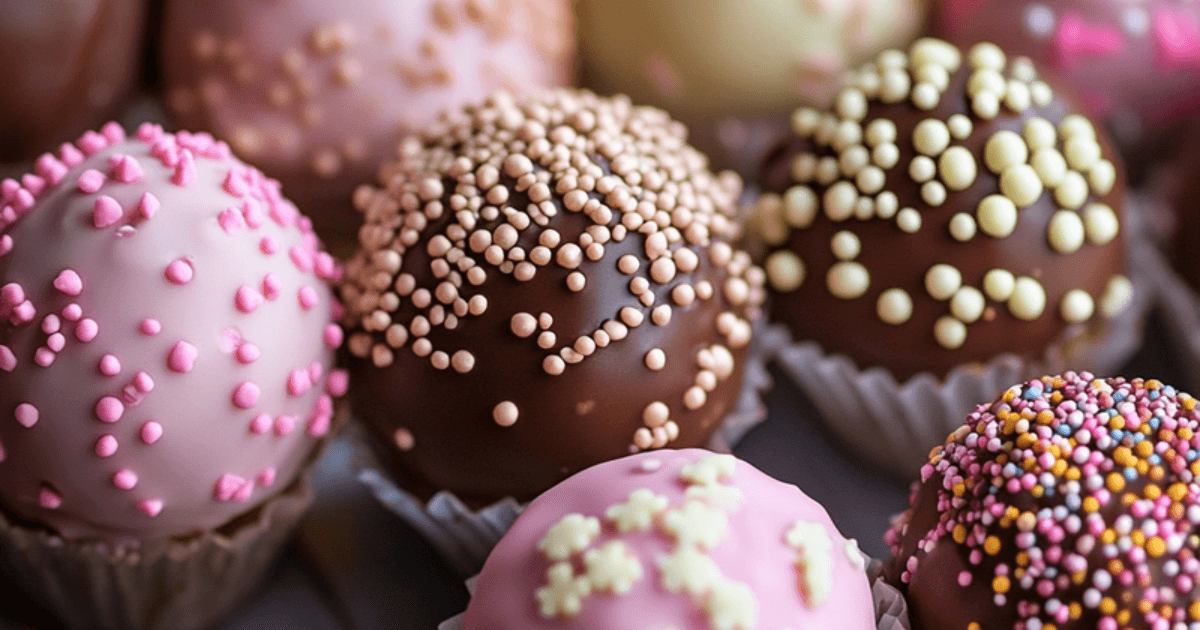
Creative Decorating Ideas and Toppings
When it comes to creating stunning vanilla cake balls, decoration is where your creativity truly shines. My easy cake balls recipe becomes a canvas for artistic expression, transforming simple treats into eye-catching desserts that will impress everyone.
Start with classic decorating techniques that elevate your vanilla cake balls. Melted chocolate drizzles provide an elegant touch, while colorful sprinkles add playful charm. Professional bakers recommend using candy melts for smooth, vibrant coatings that stick perfectly to your cake balls.
| Decoration Type | Difficulty Level | Visual Impact |
|---|---|---|
| Chocolate Drizzle | Easy | High |
| Sprinkle Coating | Very Easy | Medium |
| Themed Decorations | Intermediate | Very High |
For themed events, consider matching your cake ball decorations to the occasion. Holiday-specific designs like red and green sprinkles for Christmas or pastel colors for Easter can make your vanilla cake balls truly special.
Professional tips include using small piping bags for precise designs and allowing each layer of decoration to set completely before adding the next. With practice, you’ll create cake balls that are as beautiful as they are delicious.
Storage Tips and Shelf Life
Storing your homemade cake balls correctly is crucial to maintaining their delicious taste and texture. Whether you’ve made traditional or no-bake cake balls, proper storage can help preserve their quality and extend their freshness.
After crafting your delectable no-bake cake balls, you’ll want to keep them in optimal condition. The right storage method depends on when you plan to enjoy them and the specific ingredients used.
Refrigeration vs. Room Temperature
Homemade cake balls with cream cheese or dairy-based frostings require refrigeration. Store these treats in an airtight container in the refrigerator for up to 7 days. For cake balls with more stable frostings, room temperature storage works well, keeping them fresh for 2-3 days in a sealed container.
Freezing Instructions
Freezing is an excellent option for long-term storage of your cake balls. Wrap each cake ball individually in plastic wrap, then place them in a freezer-safe container. No-bake cake balls can be frozen for up to 3 months. Before serving, thaw them in the refrigerator overnight.
| Storage Method | Cake Ball Type | Recommended Duration |
|---|---|---|
| Room Temperature | Stable Frosting | 2-3 days |
| Refrigeration | Dairy-Based Frosting | Up to 7 days |
| Freezer | No-Bake Cake Balls | Up to 3 months |
Remember to keep your homemade cake balls away from strong-smelling foods to prevent flavor absorption. With these storage tips, you can enjoy your delightful treats at their best!
Common Mistakes to Avoid When Making Cake Balls

Creating the perfect cake balls recipe can be tricky, even for experienced bakers. I’ve learned that some common mistakes can quickly turn your delightful cake truffle recipe into a culinary disappointment. Knowing what to watch out for will help you craft professional-looking treats every time.
One of the biggest pitfalls in making cake balls is using overly moist cake. When your cake base is too wet, the mixture becomes challenging to roll and shape. I recommend letting your cake cool completely and crumbling it into fine, dry crumbs before mixing with frosting. This ensures a consistent texture that’s perfect for forming cake balls.
Temperature control is crucial when working with chocolate coatings for your cake truffle recipe. Melting chocolate at too high a heat can cause it to seize or become grainy. Always use low, gentle heat and stir frequently. If you’re using a microwave, heat in short 15-second intervals, stirring between each burst.
Another frequent error is adding too much frosting to your cake balls mixture. Start with small amounts and gradually incorporate more until the mixture holds together when rolled. Too much frosting makes the balls fall apart, while too little prevents them from sticking.
Chilling is a critical step many bakers overlook. After forming your cake balls, refrigerate them for at least 30 minutes before dipping in chocolate. This helps them maintain their shape and creates a smoother coating surface for your cake balls recipe.
Lastly, invest in quality ingredients. Cheap chocolate or low-grade cake mix can dramatically impact the final taste and texture of your cake truffles. Choose ingredients you’d be proud to serve to friends and family.
Conclusion
I’ve shared everything you need to create the best cake balls recipe that will impress everyone at your next gathering. From selecting the perfect cake base to mastering coating techniques, this easy cake balls recipe guide has equipped you with professional-level skills.
Remember that baking is an art of patience and creativity. Each batch of cake balls you make will improve your technique. Don’t worry about perfection on your first try – practice is key to developing your skills. Experiment with different flavor combinations, decorative styles, and coating options to make these bite-sized treats uniquely yours.
My top recommendation is to have fun in the kitchen. The beauty of an easy cake balls recipe is its flexibility. Whether you’re preparing for a birthday party, holiday event, or simply craving a sweet treat, these delightful morsels are sure to bring smiles. Your newfound knowledge will transform you from a novice baker into a cake ball expert.
Embrace the joy of baking and let your culinary creativity shine through each delicious cake ball you create. With practice and passion, you’ll soon be crafting professional-quality treats that look as amazing as they taste.